Getting Started
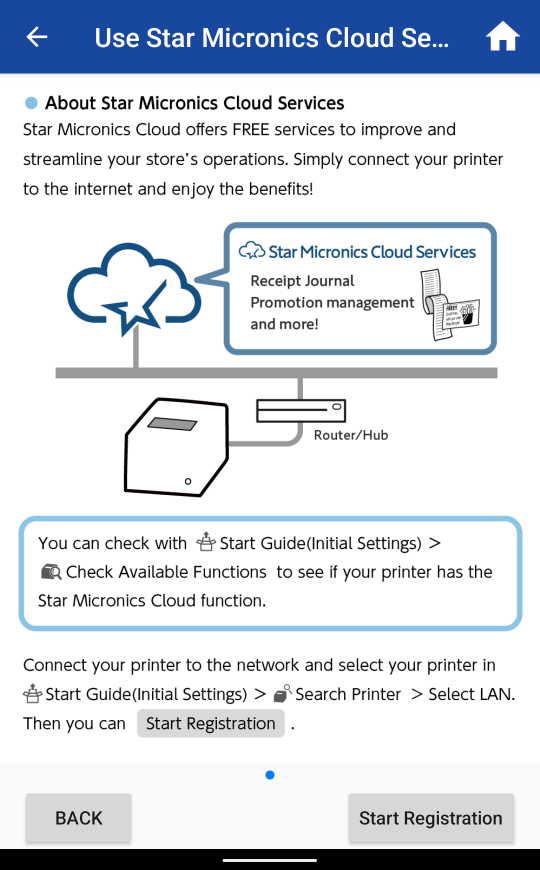
Star Micronics Cloud Services (hereinafter SMCS) provides an API that functions in conjunction with a Star Micronics-manufactured printer and its peripherals.
Device Manager API has the following three access privileges depending on functionality:
| Receipt data | It is possible to access the receipt data (image) of printing by a printer connected to SMCS. |
| Status | It is possible to acquire various status information of a printer connected to SMCS. |
| Firmware update and setting change | It is possible to perform update and change various settings of the firmware of a printer connected to SMCS. |
Step 1: Signing up for SMCS
To use the API, a developer needs to create an SMCS account. To create an account, go to the account creation pageopen in new window and enter necessary information.
Step 2: Registering a device (printer)
Device Manager API is an API for accessing and making use of data obtained from a device (printer) connected to SMCS. Therefore, a device (printer) of interest needs to be registered in SMCS.
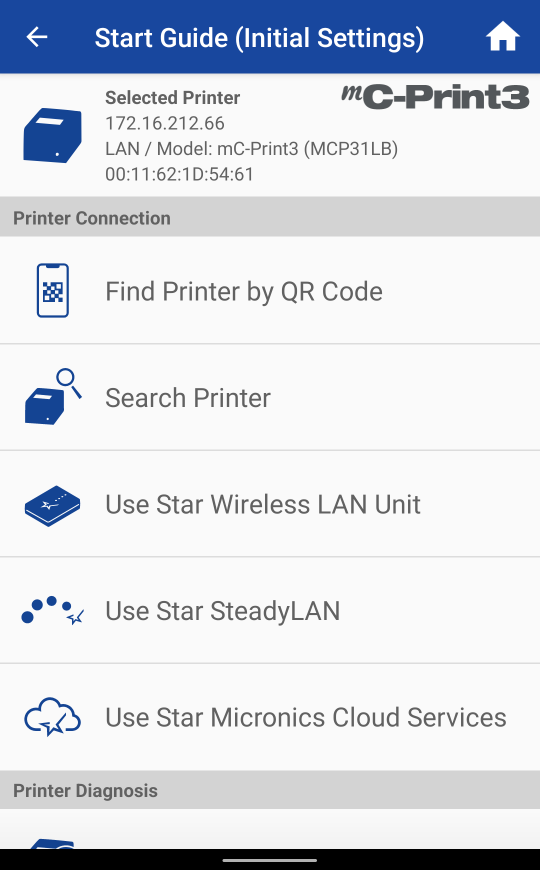
Step 2-1: Connect a device (printer) to the Internet.
The printer models that support the Device Manager API are listed below. For the Internet connection method of each model, refer to each online manual.
- TSP100IV (Firmware ver.3.2 or later)
- TSP100IV SK (Firmware ver.3.2 or later)
- mC-Print3 (Firmware ver.3.82 or later and earlier than ver.5.0)
- mC-Print3 (Firmware ver.5.3 or later)
- mC-Print2 (Firmware ver.3.82 or later)
- mC-Label3
- mC-Label2
"Connect LAN Cable" in the online manual
Step 2-2: Register a device (printer) in SMCS.
Four registration methods are available as shown below. Select the method suitable for your usage environment.
| Terminal used | Tool | Use scene | |
|---|---|---|---|
| Using a camera | Smartphone, tablet or PC connected to the Internet | Web app | It is recommended for a user who uses only SMCS device registration. |
| Printer setting screen (Web Configuration) | Smartphone, tablet or PC on the same network as the printer | Web app | Web Configuration is also used for setting a fixed IP address for the printer. It is recommended for use in an environment that requires a fixed IP address. |
| Using the Star Quick Setup Utility | iOS or Android terminal connected to the printer | Native app (needs to be installed) | Star Quick Setup Utility is used in printer initialization. It is recommended for a user who needs to change detailed settings. |
| Developer-specific (Under Consideration) | Device capable of sending a command to the printer | Dependent on a higher level app by a developer | This is a method that is completed within a higher level app that a developer |
Using a camera
- Use a smartphone, tablet, or PC to access the following URL:
http://account-manager.smcs.site/scan
- Or, read the following QR code:

- Log in with your SMCS account.
- Press the "Scan" button to scan the serial number barcode on the bottom surface of the printer.
- Operate the printer following the directions on the web site.
- The marketplace for stores is displayed and the connection of the printer to SMCS is completed.
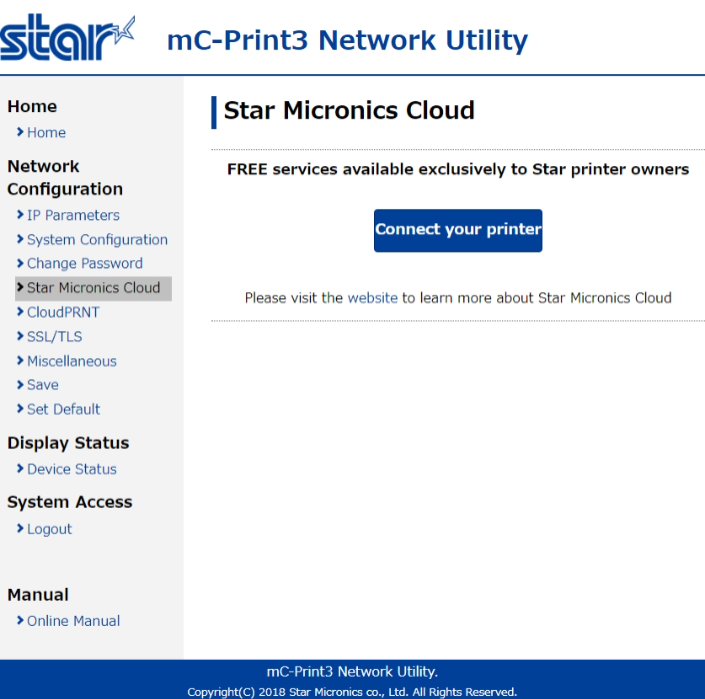
Printer's Setting Screen (Web Configuration)
- Open Web Configuration with a browser from a device on the same network as the printer.
"Open Printer's Setting Screen (Web Configuration)" in the online manual
Information on how to use Web Configuration is available from here
- Select Star Micronics Cloud from the left tab and press the “Connect your printer” button.
- Log in with your SMCS account.
- The marketplace for stores is displayed and the connection of the printer to SMCS is completed.
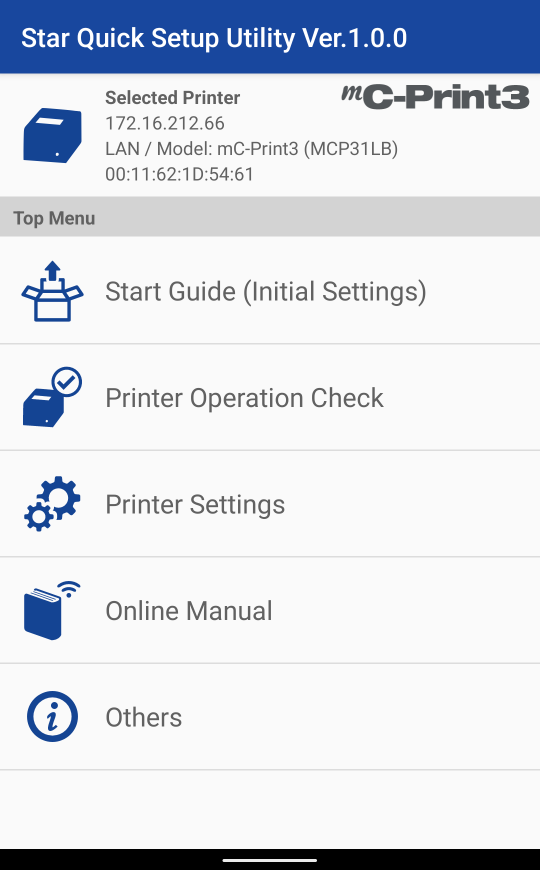
Using Star Quick Setup Utility
- Install Star Quick Setup Utility from App Storeopen in new window or Google Playopen in new window.
- Connect to the printer from Star Quick Setup Utility.
- Press the registration start button and log in with your SMCS account.
- Operate the printer following the directions on the web site.
- The connection of the printer to SMCS is completed.
Developer-specific (Under Consideration)
- We are investigating new ways to register a printer outside of the SMCS Dashboard and we’d love to hear your suggestions!
To share your feedback, contact your regional sales representative or sales@starmicronicscloud.com.
Step 3: Requesting an application
The use of API requires application request. Enter the following information in the application form on Dashboard section to apply:
- Application name
- Application outline (Example: POS app, and mobile order app)
- Kinds of data to use (receipt data, status information, firmware update and setting change)
- URL of company website, URL of service to be offered (optional)
An application ID is issued on requesting an application and will be effective after examination by us. The latest information can be checked from the dashboard for SMCS developers.
- Application ID
- Access privileges (receipt data, status information, firmware update and setting change)
Step 4: Testing an API request
Use the SMCS sandbox to test an API. Testing is possible with this environment before deployment of an unique service in a real environment.
Points to note when using the sandbox
- Use the application ID for the sandbox.
- Use the dashboard to switch to the sandbox environment for the printer.
Step 5: Starting development using the SMCS API
After signing up for the SMCS account and testing some APIs in a sandbox environment, you can start building. For the kinds and specifications of API, refer to API reference. The application ID to use in acquiring a token can be checked from the dashboard.
This API can grant a right to access an API using the OAuth2.0 authorization code flow with Proof Key for Code Exchange (PKCE).
| Protocol Endpoints | |
|---|---|
| Auth URL | https://account.starmicronicscloud.com/retailer/signin/oauth2/v2.0/authorize |
| Token URL | https://account.starmicronicscloud.com/retailer/signin/oauth2/v2.0/token |
| Refresh URL | https://account.starmicronicscloud.com/retailer/signin/oauth2/v2.0/token |
OAuth2.0 authorization code flow with PKCE
The Proof Key for Code Exchange (PKCE) flow is defined in OAuth 2.0 RFC 7636.open in new window
The OAuth2.0 authorization code flow is defined in Section 4.1 in the specification of OAuth 2.0.open in new window